


Nails of the Week.

Decided to go for a sparkly antique gold manicure this week, so I used two polishes: OPI “Glitzerland”, and Sephora by OPI’s gold sparkle topcoat in “Only Gold For Me” over top. I’m really happy with how it came out!
Nails of the Week.

Sephora by OPI – “Brunette on the Internet”
A really pretty deep merlot color. Perfect for fall. I actually think this might be my favorite autumn nail color in my collection! I’d write more, but frankly I’m far too tired. x
Sephora Haul
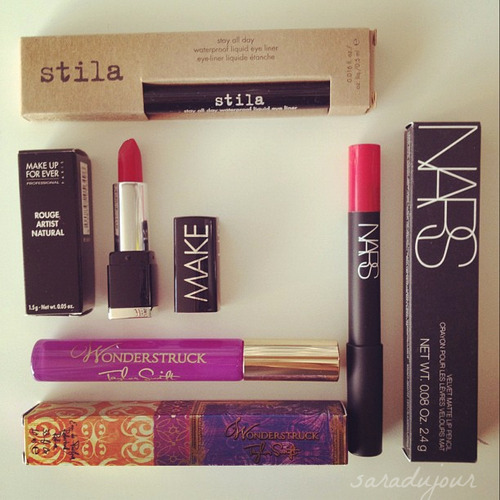
I know what you’re thinking: another Sephora haul? Well, yes. It’s not been a good month for my credit card, I’ll tell you that. But also, all of my orders seem to be arriving all at once. So there’s that.
Anyway – my Sephora package came last night, but I was so exhausted that I didn’t even open it until this morning. I bought three things, and got several things for free, as well, which is always nice. I bought: Continue Reading →
Fall Scents Candle Haul
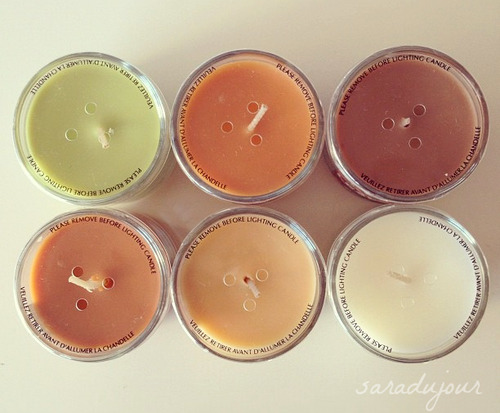
All year long, I wait for autumn to come around so that I can stock up on fall-scented candles from Bath and Body Works. Slatkin & Co. candles are the best ever, but Bath and Body Works release certain scents at certain times of the year, along with new limited addition scents. So when I got the newsletter e-mail from them that they were having a fall sale on candles, naturally I had to scoop them up. I meant to only buy one or two, but when I saw how many amazing scents they had that I wanted to try, that plan changed. Continue Reading →
Nails of the Week.

I love the summer trend of white nails, but I’d never had the guts to try it myself, for a few reasons. Firstly, because white nails tend to look best on those with a tan or darker skin tones, and secondly, because white nails run the risk of looking chalky and like white out.
But I finally decided to try it out, and though it feels like autumn outside, it’s still technically summer (until the 22nd), so I thought I could get away with it. After this, I think I’m switching to more traditional fall nail colors, like deep reds, burgundies, and jewel tones, but for this week I’ll make the most of happy bright summer colors.
After painting my nails with a few coats of OPI’s Alpine Snow, I was happy with the result, but felt they needed a little something extra. Or maybe I was just a bit bored and had some time on my hands. Either way, I decided to experiment and do a bright, stripey accent nail on each hand. On my left hand, I used Essie’s Mint Candy Apple, and on my right, Maybelline’s Love Me Lavender. I think the result is so fun and cheerful. I feel like it’s still summer every time I see my nails! :)
Now reading.
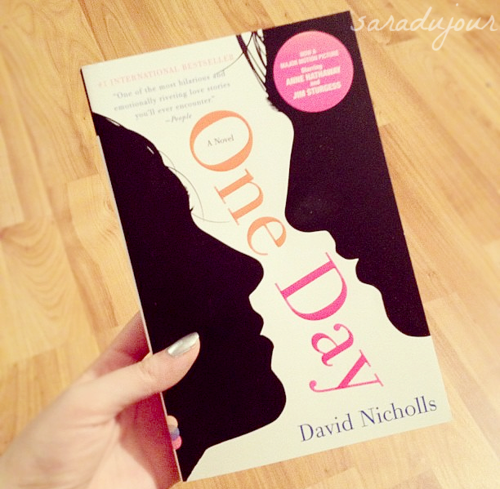
I just finished reading The Gun Seller, by Hugh Laurie yesterday – which, by the way, was fantastic and brilliant and incredibly witty – and today I started reading One Day, by David Nicholls. I’m not far enough to form an actual opinion on it yet, but I haven’t fallen in love with it immediately the way I do with some books. But perhaps it’ll grow on me. A lot of people told me they liked it, so we’ll see! x
Nails of the Week.
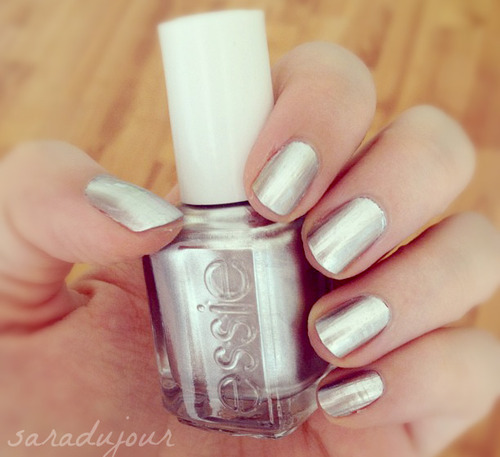
I’d been looking for a good, reflective silver nail polish for what seems like ever, after seeing a photo of the silver “mirror” nails in a post on tumblr. After researching and finding that those specific ones are quite expensive and only done at select salons, (they’re called Minx nails, if you were wondering), I nearly gave up hope on finding a great silver nail product. Most of the silver polishes I’d seen on the market either had shimmer or glitter in them, or weren’t metallic enough, and were sort of just… grey, which isn’t what I was looking for.
But then Essie came out with their “Mirror Metallics” collection, and I thought I’d give this color a try. It’s called “No Place Like Chrome” (punny, right?), and is exactly what I hoped it would be. It applied really nicely, and though it isn’t quite as reflective as its stick-on counterpart, it is very metallic and gives a similar effect. Plus, it’s way cheaper and I can do it myself! Overall, I’m really happy with it, so I highly recommend it if any of you have also been eyeing the mirror nails effect! x
Nails of the Week.
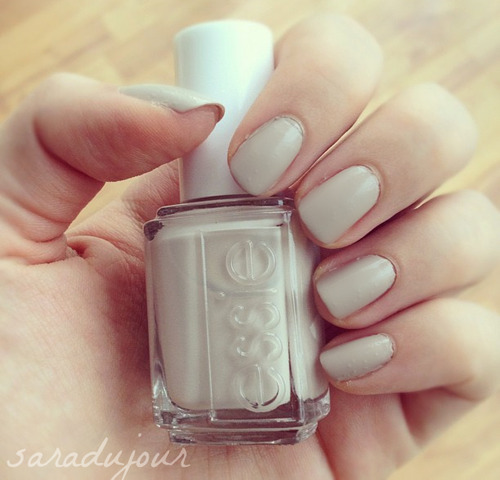
Painted my nails with Essie’s “Sand Tropez”, a pretty beige grey. I think it’s a lovely clean nail look, even though it’s not a traditional “nude” color. I’d heard so much hype about this polish online, and I have to say – so far I really like it! It also feels nice to take a bit of a break from all the bright nail colors I’ve been wearing lately, and switch to something more understated. x
Nails of the Week: Mint French Tips
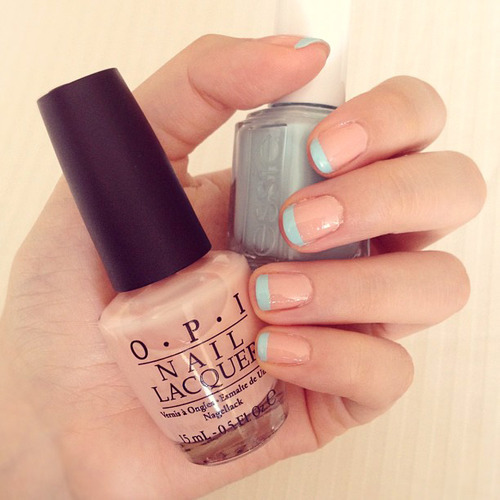
This week I decided to try a nail trend I’ve been admiring for a while: the classic French manicure, but with a colorful twist. I chose to keep the base color the classic nude, but instead of traditional white tips, I chose mint green. I’m really happy with the result – it’s simple, modern, and chic. Here’s how I achieved this look:
- Make sure your nails are perfectly clean and well groomed before you begin. This is an important first step before any manicure, but particularly when using a nude color, since any traces of dirt or previous polish color will show. When doing French tips, it’s also important to make sure all your nails are roughly the same shape.
- Using the base color of your choice (I used OPI’s Coney Island Cotton Candy), paint all your nails, using as many coats as you like. I did roughly 3 coats. Let this dry thoroughly before proceeding to the next step.
- Once dry, apply self-adhesive pre-cut nail painting guides on each nail (or, if you’re really brave, skip this step and do the tips free hand). Make sure all the nail painting guides are the same distance from the edge of your nail. You don’t want to have some thick French tips, and some thin.
- Using the tip color of your choice (I used Essie’s Mint Candy Apple), paint in the tips. If using nail guides, you don’t have to be particularly neat about it since once you peel them off, you’ll have clean lines (think painter’s tape). If you’re doing it free hand, however, go slowly and be very careful.
- Peel off the nail guides, and you’ve got perfect French tips!
- Apply a top coat to seal everything in. I use OPI’s Top Coat, it’s my favorite. This also fills in any gaps between the base layer and the tips, giving a smooth appearance.
And voilà, you’re done! Though time consuming (since you have to wait for the base to dry before doing the tips), this is a simple technique that yields really cute results. Plus, you can experiment with any color combination you like. Happy nail painting! x


